TEST VEDIO


Introduciton
MTF-01 is a range sensor integrated with opticalflow . It uses uart to output sensor data and supports many protocols, make it compatible with mainstream open source flight controllers such as Ardupilot, PX4 and INAV. It can be used directly after simple configuration without complicated development process.
MTF-01 features an integrated PMW3901 optical flow sensor and a high-performance TOF sensor, which can be used normally in outdoor sunlight environments.
Spec
Product weight: 4.5g
Product size: 29 * 16.5 * 15mm
Output mode: UART
Output frequency: 100Hz
TOF Range: 0.02-8m
Range accuracy: 2%
Wavelength: 830-870nm
Resistance to ambient light: 70K Lux illumination
Distance FOV: 6 °
Optical flow FOV: 42 °
Ambient light demand of optical flow:>60Lux
Optical flow working distance:>80mm
Power consumption: 500mW
Operating voltage: 4.0- 5.5V
Operating temperature: - 10 ° C-60 °C
Protocols
MTF-01 module integrated with multiple protocols,include:
- Micolink -- a custom protocol, can support FMT
- MSP -- supports INAV
- Mavlink_APM -- the mavlink protocol that can support ardupilot
- Mavlink_PX4 -- the mavlink protocol that can support PX4
The output protocol of MTF-01 can be switched quickly with the MicoAssistant, a software run on win10/win11.
Set up protocol by using MicoAssistant
Step1
Connect the MTF-01 to PC by using the USB to TTL module.

Step2
Open the windwos device manager and check if the USB moduleis has been recognized.
Step3
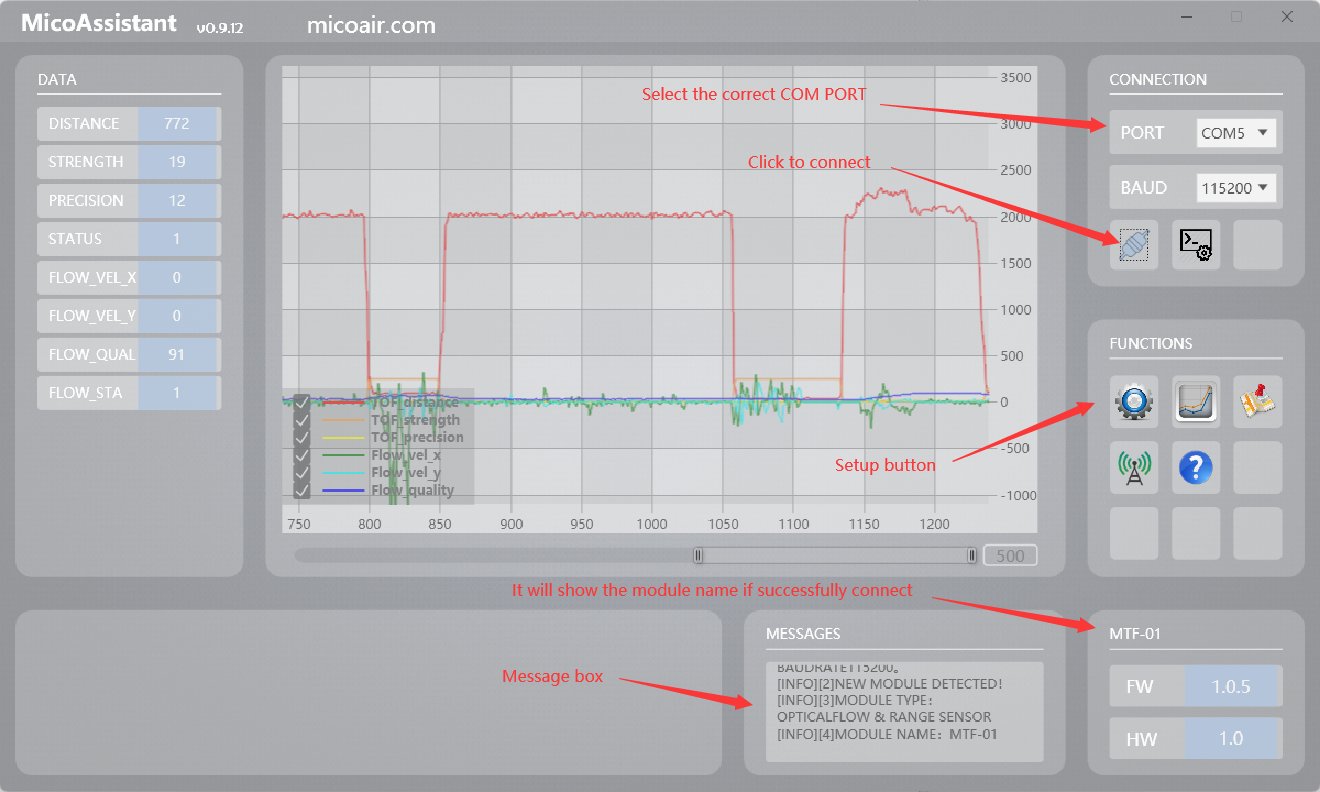
Open the MicoAssistant software, select the correct COM in the upper right corner, baudrate should be 115200, and then the connection icon.

Step4
If the MTF-01 has been successfully connected, the software will recognize it, and will output some messages and display the firmware version in the lower right corner. Then you can click the "SETUP"(gear) icons to open the setup page, it will happens nothing if there is any wrong with the connection, and you should check the previous steps.
Step5
Select the protocol you want to use in the setup page, and then click the write button, the output protocol of the module will be successfully modified, and the software message box should display a message that the setting is successful.

